Please see the video or follow the below steps in 5 minutes or less to deposit funds sent to your email address.
Accepting payments sent via email:
Step 1: The recipient will receive an email from Veem informing them about this payment. From the email, please select "Accept Payment" to access your custom claim page.

Step 2: On the next page, you'll see the payment details, click "Continue".

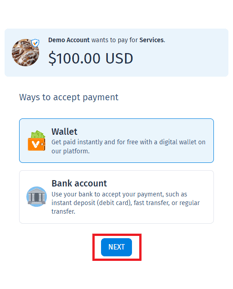
Step 3: The next part will require you to select your receiving method. Select the preferred receiving method and click "Next".
Step 4: Clients that selected a bank account or instant deposit (debit card) will be prompted to add their banking/card details. Add the required information accurately and click "Next"
- You'll have the option to add your banking details, either through our express sign-up or by manually entering your banking information.
Step 5: Next, please select the account type, depending on whether you are a business or an individual. This will alter the information required to validate your account with our risk team.
- For business account types, please enter the Business Information Including:
- Business Name
- Phone Number
- Address
- Business Type
- Industry and Sub Industry
- Primary Contact Name
- Tax ID Number
- For individual/personal account types, please enter your personal Information Including:
- Legal First Name
- Legal Last Name
- Date of Birth
- Last 4 digits of your SSN
- Note: This information may differ based on the country you're in.
- Phone Number
Steps 6 & 7: Complete additional information to help identify your business like website and business size (If any).
Step 8: Review the details and confirm that they're all accurate.
Step 9: Select "Next".
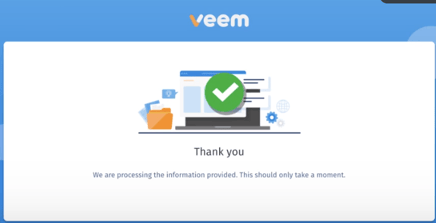
That's it! The payment has been accepted and will be processed after the verification process is done!
Step 10: (Optional) You can opt to activate your Veem account for easiness in tracking payments and updating account information and accessing more of Veem's features. To do this, create a password. (Note: Your password must contain an uppercase, lowercase, number, and special character)
- After creating your password, click on the button "sign-in" to activate your account. You'll be redirected to the dashboard page after that.
NOTE: The receiving currency is automatically set as the receiver's country's local currency when the payment is submitted.
Still need help? You can chat or call our Customer Success team here.